基于AnyLogic搭建多智能体模型验证Lanchester方程线性律和平方律
写在前面
这篇文档是一篇备忘文档。记录了我使用AnyLogic搭建智能体群,并用其验证Lanchester方程线性律和平方律的过程。Lanchester方程是一种数学解析模型,用以模拟对战过程中交战双方作战能力的损耗情况,它分为线性律和平方律。
线性律的表达式为
\[\left \{ \begin{matrix} \frac{\text{d}y}{\text{d}t}=-\alpha,\\ \frac{\text{d}x}{\text{d}t}=-\beta \end{matrix} \right. \tag{1}\]式中,$x(t)$ 和 $y(t)$ 分别是红、蓝方在 $t$ 时刻的作战能力,$\alpha$ 和 $\beta$ 分别是红方对蓝方的损耗系数和蓝方对红方的损耗系数。损耗系数为单位时间内一方可摧毁另一方多少作战能力的意思。线性律适用于描述冷兵器对抗的作战过程,对抗双方贴身肉搏,一对一捉对拼杀。
平方律的表达式为
\[\left \{ \begin{matrix} \frac{\text{d}y}{\text{d}t}=-\alpha x, \\ \frac{\text{d}x}{\text{d}t}=-\beta y \end{matrix} \right. \tag{2}\]式中,$x(t)$ 、 $y(t)$ 、$\alpha$ 和 $\beta$ 的意义与式(1) 一致。平方律适用于描述火器对抗的作战过程,对抗双方远距离点火力射击,也能体现现代战争中集中优势兵力原则对于作战过程的影响。
也有学者使用Lanchester方程对历史战例进行分析,取得了比较好的效果。此外,许多实时策略游戏(例如星际争霸2)、战棋游戏(例如火焰之纹章)、兵棋游戏(例如红龙)等不同单位之间的损耗过程也参考了Lanchester方程进行设置,所以Lanchester方程应用的十分广泛。
借鉴上面的现状,我在想,有没有一种方式可以用来验证一下Lanchester方程的正确性。真要进行一场战斗是不可能了,因为这样代价太大了,而且也不是我们普通人可以实施的方案。所以呢,为了得到作战数据,采用了仿真手段进行作战过程的模拟,看看能不能从这里面得到一些有用的结论。
加上AnyLogic这个软件在仿真界比较常见,也比较权威、专业,许多学者用它来做多智能体模型、系统动力学分析,应用领域十分广泛,有供应链和物流、制造业、市场和竞争、项目和资产管理、社会和生态动力学、国防等领域。因此,我选用AnyLogic搭建多智能体模型,用以验证Lanchester方程线性律和平方律。
这篇教程里面已经默认读者在电脑上安装了AnyLogic。没有安装的读者可以去AnyLogic官网申请个人学习版。
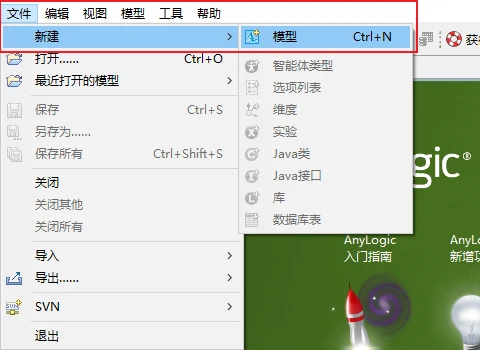
1. 创建新模型
点击左上角“文件”,再点击“新建”,最后点击“模型”。
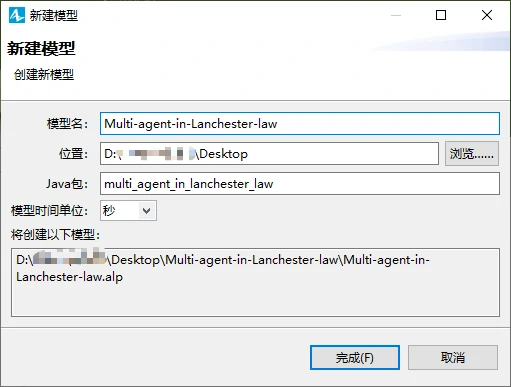
新建模型,模型名字根据自己喜好起,位置放在一个自己之后比较好找的位置,模型时间单位选秒(或者其他单位均可)。设置完毕后,点击“完成”。
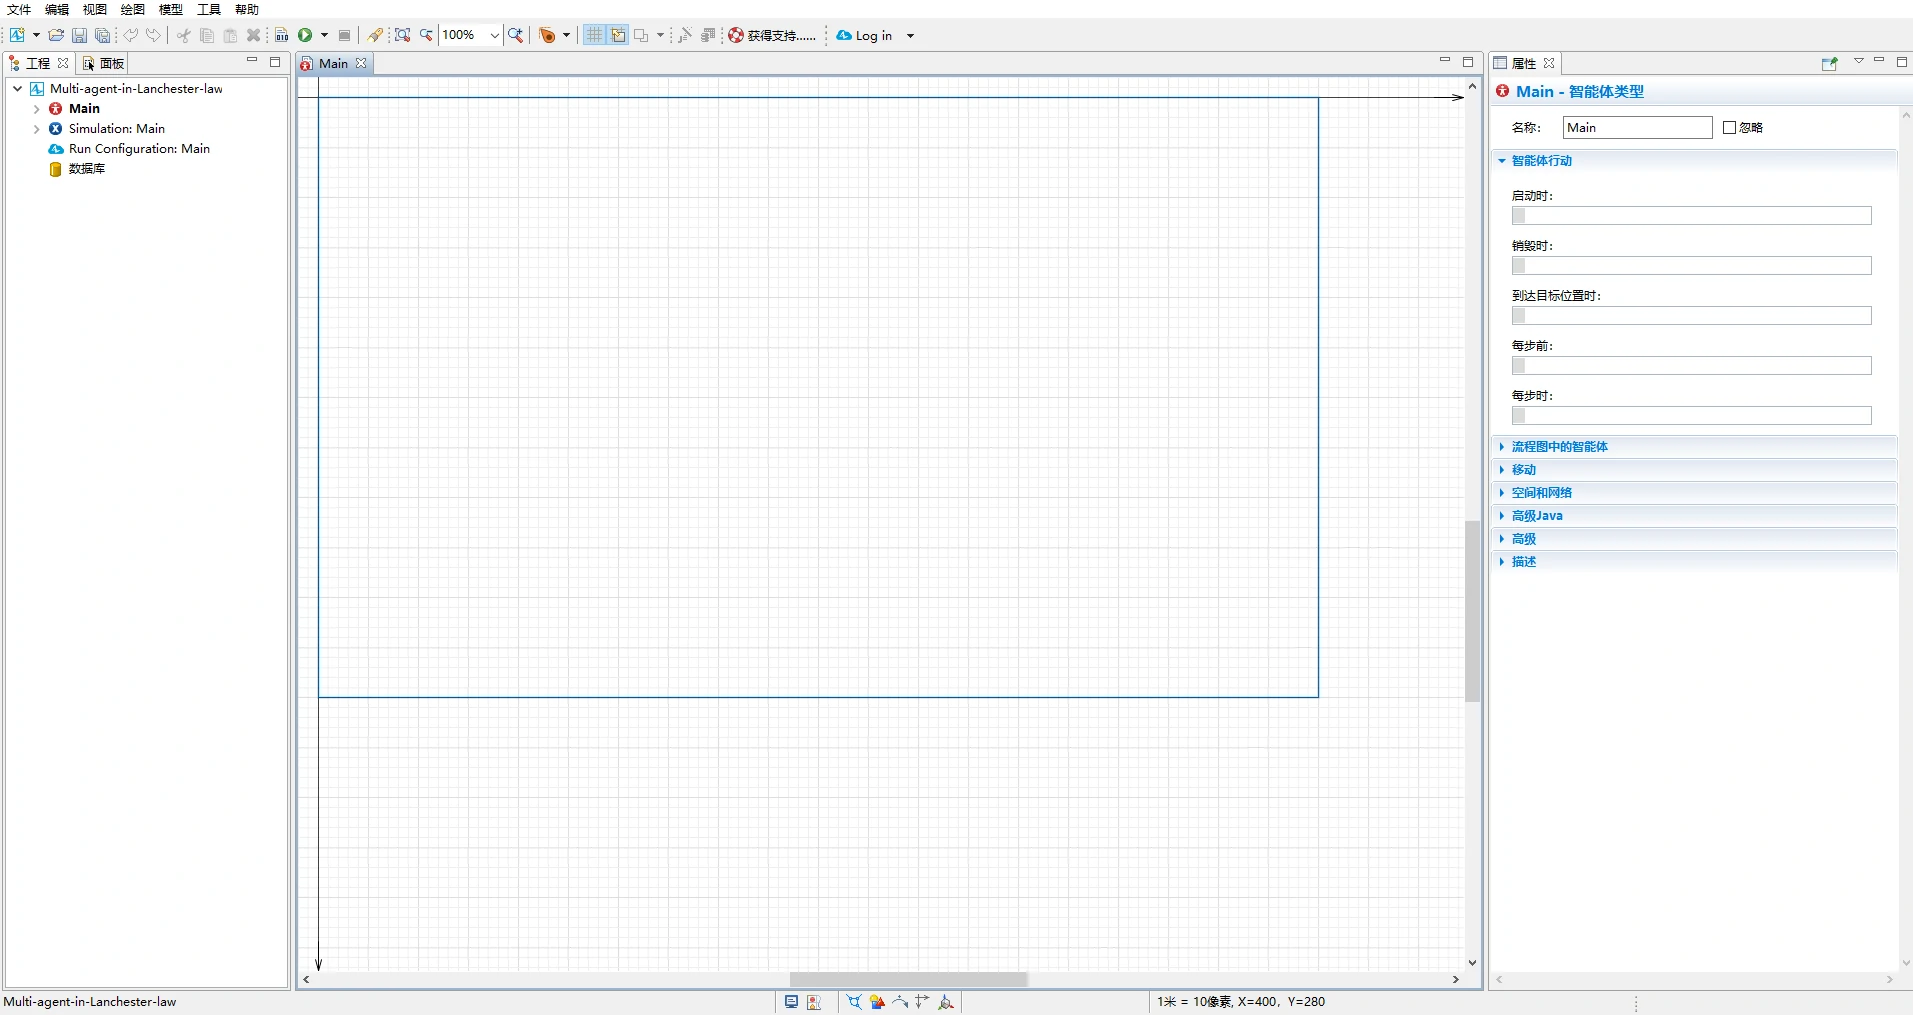
这样一个模型界面就建立好了,如果没有出意外的话,会看到下面这样的画面。
2. 创建场景
这里说的场景是指在Main里面的场景,分为三个部分,
- 规定好智能体移动的范围,相当于一个平台;
- 把智能体画出来;
- 添加智能体需要的参数和变量,以及需要导出的参数变量。
这里需要用到“面板”中的“演示”里面的各种形状,包括:
- 折线
- 矩形
- 直线
经过一番画图和添加参数,会得到下面这样的场景。
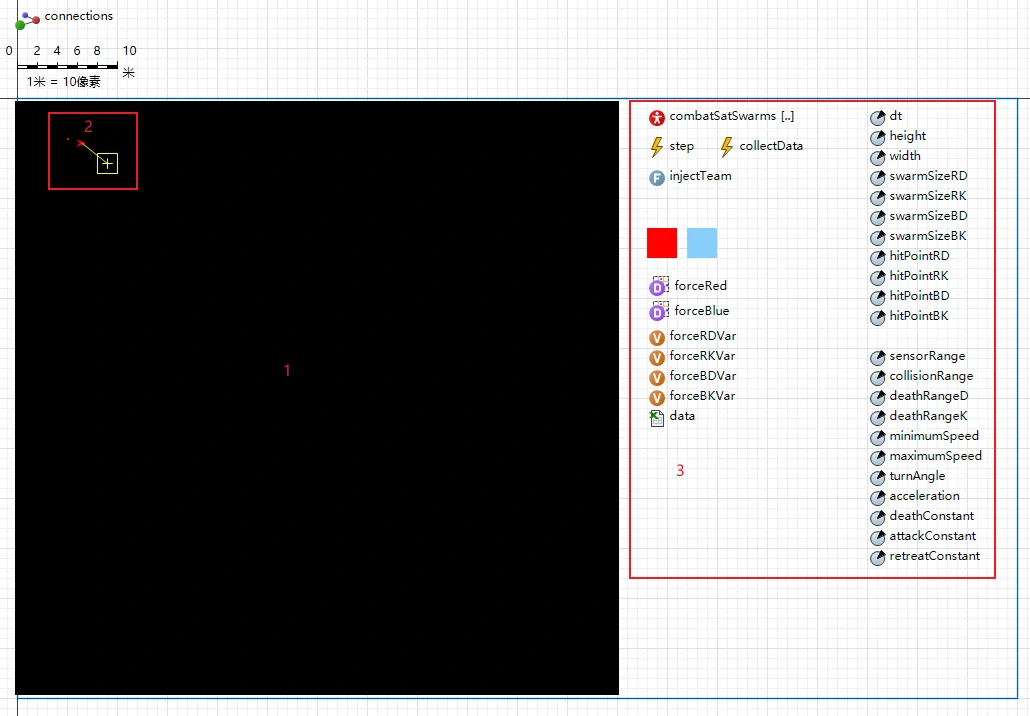
图片中的1、2、3和上面写到序号1、2、3相对应。1对应的就是平台,这里我设置的尺寸是600*600,设置参数的步骤在第3节说。
2对应的是智能体,红色小箭头就代表了智能体,可以用折线画出来;红色箭头后面只有一点点大的红色小点可以用矩形画出来,后面用来产生动画效果的轨迹;红色箭头右下角的黄色几何图形代表该智能体的瞄准方向,可以用直线和矩形画出来。
3对应的是智能体需要的参数和变量,在下一节会详细讲怎么添加以及设置参数。
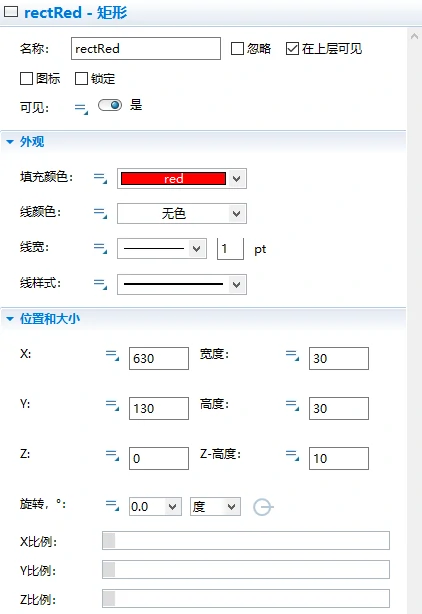
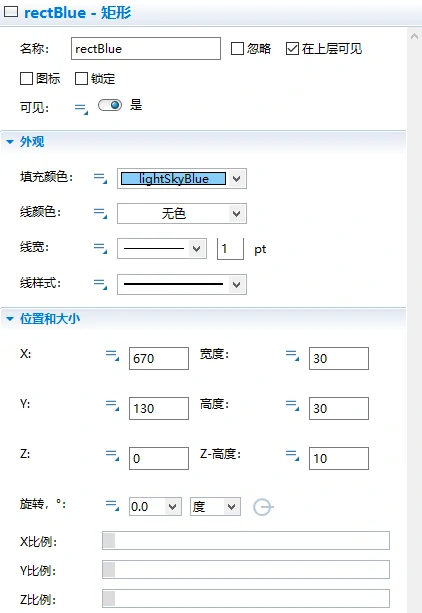
在这里说一下3中有个红色的方块和蓝色的方块,这两个方块可以用矩形画出来,是用来设置智能体的颜色的,它们的设置如下:
3. 添加场景参数
这里分了如下几种类型的参数:
- 参数;
- 变量;
- 数据集;
- excel文件;
- 事件;
- 函数;
- 智能体群。
3.1 参数
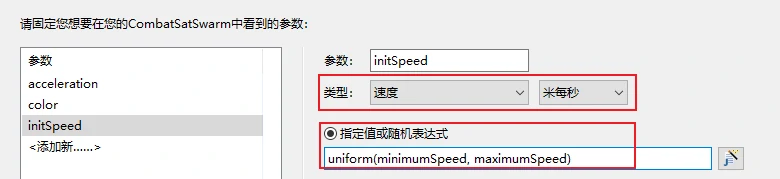
按照如下顺序把参数添加进场景中:“面板”——>“智能体”——>“智能体组件”——>“参数”,鼠标左键单击就可以把参数拖拽进场景中了,设置参数名称、类型和默认值在“属性”栏中设置。鼠标左键单击参数图标左边的小圆圈就可以了(注意:点文字是没有用的),像下图一样设置参数。
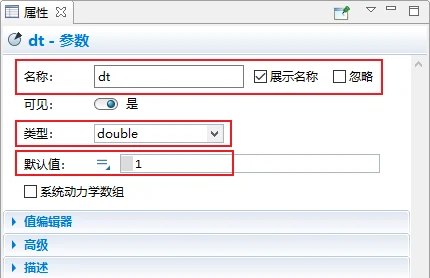
这里给出所有用到的参数的名称、类型和默认值。下面这些参数用于智能体combatSatSwarm的参数设置。
| 名称 | 类型 | 默认值 | 名称 | 类型 | 默认值 |
|---|---|---|---|---|---|
| dt | double | 1 | sensorRange | double | 150 |
| height | double | 600 | collisionRange | double | 5 |
| width | double | 600 | deathRangeD | double | $100^*$ |
| swarmSizeRD | double | 500 | deathRangeK | double | $10^*$ |
| swarmSizeRK | double | 500 | minimumSpeed | 速度(米每秒) | 2 |
| swarmSizeBD | double | 170 | maximumSpeed | 速度(米每秒) | 5 |
| swarmSizeBK | double | 170 | turnAngle | double | 0.23 |
| hitPointRD | double | 1 | acceleration | double | 0.05 |
| hitPointRK | double | 1 | deathConstant | double | 0.23109 |
| hitPointBD | double | 10 | attackConstant | double | 1.69 |
| hitPointBK | double | 10 | retreatConstant | double | 1.0 |
3.2 变量
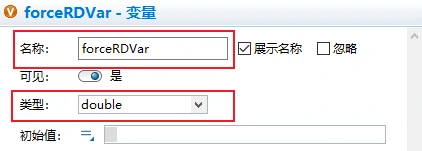
按照如下顺序把变量添加进场景中:“面板”——>“智能体”——>“智能体组件”——>“变量”,操作与添加参数的操作一样,鼠标左键单击拖拽进场景中即可,同样在“属性”栏中设置名称和类型,初始值不用设置。
这里给出所有用到的变量的名称、类型。下面4种变量用于记录对抗过程中4种不同类型兵种的数量变化。
| 名称 | 类型 | 名称 | 类型 |
|---|---|---|---|
| forceRDVar | double | forceRKVar | double |
| forceBDVar | double | forceBKVar | double |
3.3 数据集
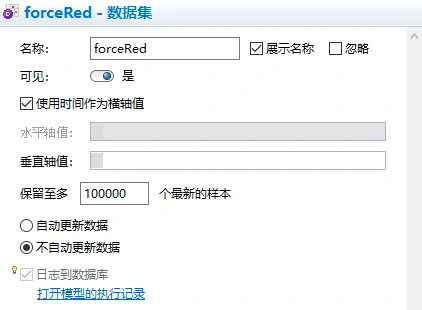
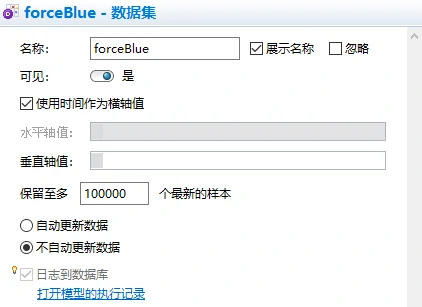
按照如下顺序把数据集添加进场景中:“面板”——>“分析”——>“数据”——>“数据集”,操作与添加参数的操作一样,鼠标左键单击拖拽进场景中即可,有两个数据集,(1)forceRed和(2)forceBlue。它们的属性按照下面的图片设置。这两个数据集用于存储红方和蓝方的兵力数量变化情况,接下来会导出至excel文件中。
forceRed的属性如下。
forceBlue的属性如下。
3.4 excel文件
按照如下步骤设置:
- 在电脑上某一位置新建一个excel文件,这里为了方便,我把excel文件创建在了AnyLogic模型文件夹里,命名为
data.xlsx; - 按照如下顺序把excel文件添加进场景中:“面板”——>“连接”——>“连接”——>“Excel文件”,操作与添加参数的操作一样,鼠标左键单击拖拽进场景中即可;
- 在属性栏中,先设置好“名称”,再在“浏览”中找到刚才新建的excel文件,点击“确定”即可。
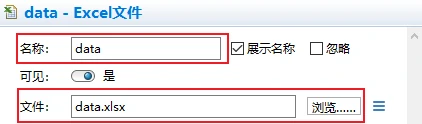
这样就把新建好的excel文件链接到AnyLogic模型中了。后面会通过代码把模型中储存的数据导出至外部的excel文件中,会在第3.7节中说明。
3.5 事件
按照如下顺序把事件添加进场景中:“面板”——>“智能体”——>“智能体组件”——>“事件”,操作与添加参数的操作一样,鼠标左键单击拖拽进场景中即可。
这里我设置了两个事件,step和collectData,代码写在“属性”栏的“行动”中,下面一一说明,每行代码的意义我会详细注释在代码旁边,这里使用的语言是JAVA。
事件: step
功能说明: 用于执行智能体的移动
引用函数:
    size()  - BIF
    get()   - BIF
    step()
--------------------------------------
for (int i = 0; i < combatSatSwarms.size(); i++) {  // 遍历所有combatSatSwarms个体
  combatSatSwarms.get(i).step();  // 每个个体都执行一遍step()函数,让它们动起来
}
step()函数是智能体群combatSatSwarm的内置函数,在第5章会介绍。
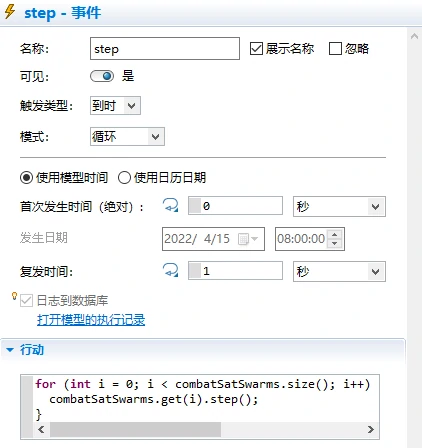
事件step的属性按照上图设置,类型选择到时,模式选择循环,复发时间(即循环时间)为1秒,即1秒触发1次step事件。
事件: collectData
功能说明: 用于收集红方和蓝方兵力数量变化数据
引用函数:
    size()  - BIF
    get()   - BIF
    add()   - BIF
--------------------------------------
for (int i = 0; i < combatSatSwarms.size(); i++) {  // 遍历所有combatSatSwarms个体
  if(combatSatSwarms.get(i).color==rectRed.getFillColor()){ // 判断这个个体的颜色是否为红色
    if(combatSatSwarms.get(i).type==RD){  // 判断这个个体的类型是否为RD
      forceRDVar += 1;  // 如果是RD,则本循环中 forceRDVar 加1
      }
  	else if(combatSatSwarms.get(i).type==RK){ // 判断这个个体的类型是否为RK
      forceRKVar += 1;  // 如果是RK,则本循环中 forceRKVar 加1
    }

  }
  else if(combatSatSwarms.get(i).color==rectBlue.getFillColor()){// 判断这个个体的颜色是否为蓝色
    if(combatSatSwarms.get(i).type==BD){  // 判断这个个体的类型是否为BD
      forceBDVar += 1;  // 如果是BD,则本循环中 forceBDVar 加1
    }
  	else if(combatSatSwarms.get(i).type==BK){ // 判断这个个体的类型是否为BK
      forceBKVar += 1;  // 如果是BK,则本循环中 forceBKVar 加1
    }
  }
}
forceRed.add(forceRDVar,forceRKVar);  // 向数据集 forceRed 添加参数
forceBlue.add(forceBDVar,forceBKVar); // 向数据集 forceBlue 添加参数
// 把变量清零,为下次事件触发时记录数据做准备
forceRDVar = 0;
forceRKVar = 0;
forceBDVar = 0;
forceBKVar = 0;
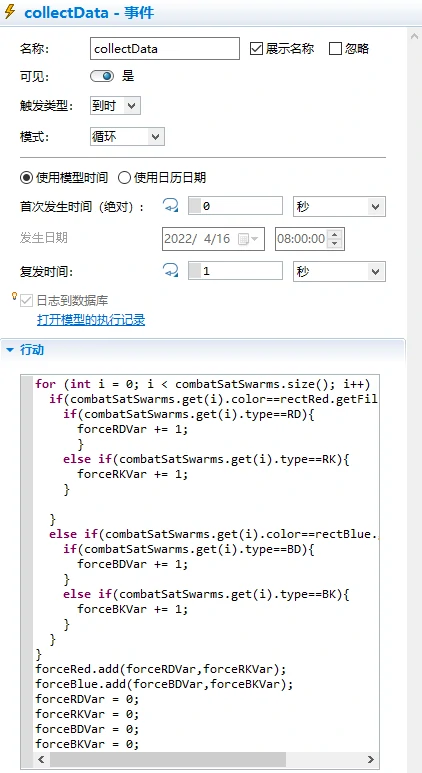
事件collectData的属性按照上图设置,类型选择到时,模式选择循环,复发时间(即循环时间)为1秒,即1秒触发1次collectData事件。
3.6 函数
按照如下顺序把函数添加进场景中:“面板”——>“智能体”——>“智能体组件”——>“函数”,操作与添加参数的操作一样,鼠标左键单击拖拽进场景中即可。
函数只有1个,injectTeam,用于在对抗初始时刻添加红方和蓝方的兵力。
同样地,
- 要写代码,写在“属性栏”里面的“函数体”中;
- 记得添加参数,参数即为函数的输入。
Function: injectTeam()
Input:
    1. color [Color]
    2. type [TypeOption]
    3. minX [double]
    4. w [double]
    5. minY [double]
    6. h [double]
    7. meanHeadig [double]
    8. teamSize [double]
    9. hitPoint [double]
    10. deathRange [double]
Constant:
    1. teamSize [int]
Output: void
-----------------------------------------------------------

for (int i = 0; i < teamSize; i++) {  // 遍历所有combatSatSwarms个体
    CombatSatSwarm css = add_combatSatSwarms(); // 设置类 CombatSatSwarm 的实例 css

	//setup team color
	css.set_color(color); // 设置颜色

	//setup team type
	css.set_type(type); // 设置类型
	css.set_hitPoint(hitPoint); // 设置HP
	css.set_deathRange(deathRange); // 设置杀伤距离

	//setup initial position, speed, heading
	css.set_initX(uniform(minX, minX + w)); // 设置初始 X 轴位置
	css.set_initY(uniform(minY, minY + h)); // 设置初始 Y 轴位置
	css.set_initHeading(meanHeading); // 设置初始方向角
}
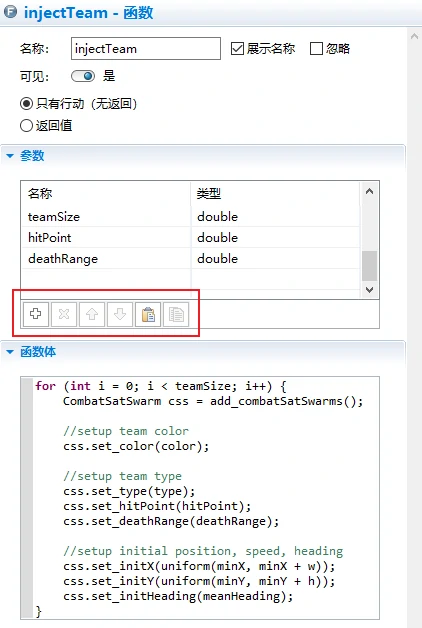
点击“+”即可添加参数。如果要删除参数的话,可以先选中要删除的参数,再点击“-”号。调换参数位置需要先选中该参数,然后点击上箭头或者下箭头。这里的参数输入顺序是很重要的,在调用函数时,输入参数的顺序不能乱。
3.7 Main设置
在Main中,点击空白处,”属性“栏会变成下面这样。
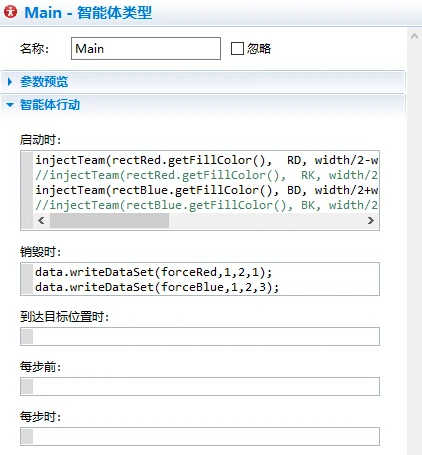
我们要设置的是“启动时”和“销毁时”的函数。
“启动时”的函数即在整个模型启动时运行一次,设置如下:
// 调用 injectTeam() 函数来生成 红蓝双方对抗兵力,输入参数的顺序严格按照
// injectTeam() 给定的输入参数顺序写
injectTeam(rectRed.getFillColor(),  RD, width/2-width/8, width/8,  0,
          height/4,   0,       swarmSizeRD,hitPointRD,deathRangeD);
//injectTeam(rectRed.getFillColor(),  RK, width/2-width/8, width/8,  0,
//           height*3/4, 0,       swarmSizeRK,hitPointRK,deathRangeK);
injectTeam(rectBlue.getFillColor(), BD, width/2+width/8, width/8,  0,
          height/4,   Math.PI, swarmSizeBD,hitPointBD,deathRangeD);
//injectTeam(rectBlue.getFillColor(), BK, width/2+width/8, width/8,  0,
//        height*3/4, Math.PI, swarmSizeBK,hitPointBK,deathRangeK);
“启动时”的函数即在整个模型关闭时运行一次,设置如下:
// 把数据写入至 excel文件 data 中。
// 注意 data 为命名好的excel文件,根据自己命名的不同,也可以写成其他名字
data.writeDataSet(forceRed,1,2,1);
data.writeDataSet(forceBlue,1,2,3);
4. 创建智能体群
创建智能体有七个步骤。
第一步:选择创建的智能体类型。按照如下顺序点击:
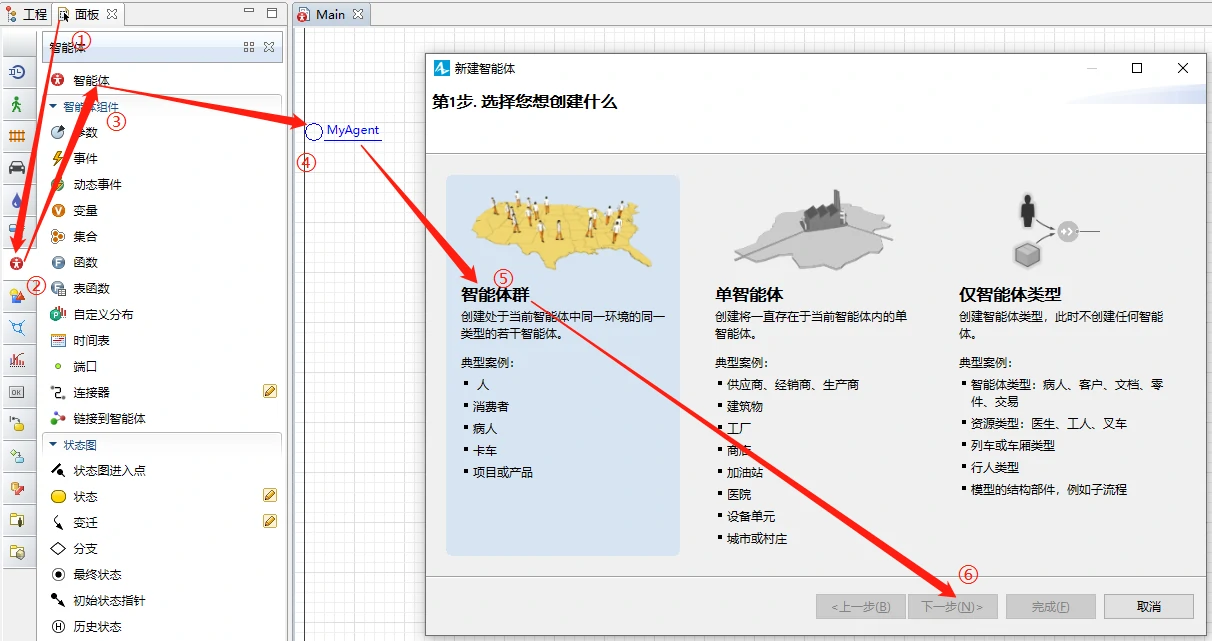
第二步: 创建智能体类型。这一步会出现两个选项,“我想创建新智能体类型”和“我想使用现有智能体类型”,在一开始创建智能体的时候,一般选择“我想创建新智能体类型”。等建立了一个智能体后,想要创建相同类型的智能体,可以选择“我想使用现有智能体类型”。点击下一步。

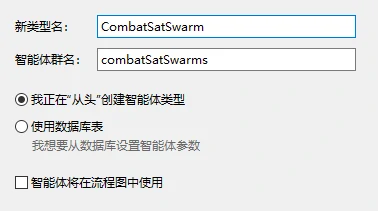
第三步:填写智能体名称。要填写的地方有两个,一个是新类型名,一个是智能体群名。类型名是这一类智能体的统称,首字母一般要大写,写好类型名后,智能体群名会自动补上。这里我只填写了新类型名CombatSatSwarm,智能体群名自动补上了combatSatSwarm。“我正在‘从头’创建智能体群”大多数情况下都得选择上,下面两个选项“使用数据库表”和“智能体将在流程图中使用”一般不选。点击下一步。
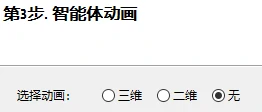
第四步:选择智能体2D/3D模型。按照自己需要选择模型即可,这里我选择了无,因为在Main中已经画好了智能体的形状。可以选择的选项有3D、2D和无,要注意这三个选项的不同。点击下一步。
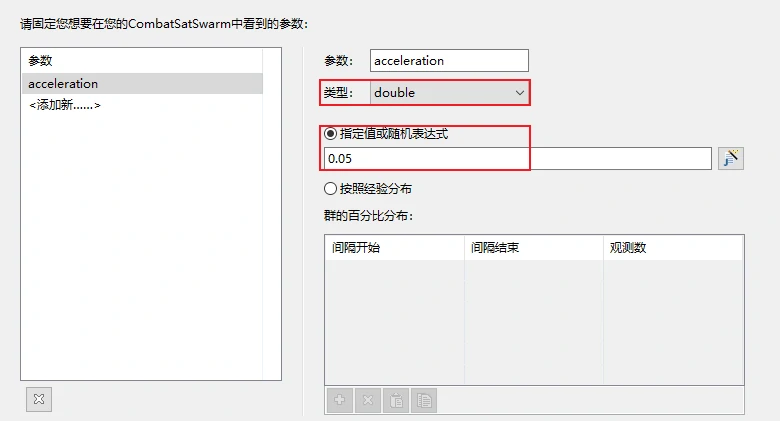
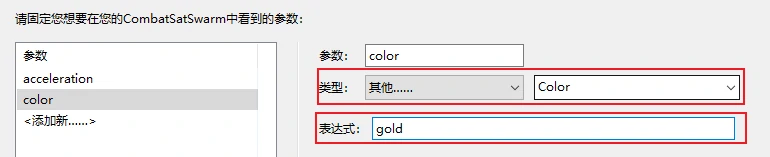
第五步:添加参数。左键单击<添加新…>来添加参数,再在参数框里面写参数名字,然后选择好类型,再点击下一步。
按照下表设置参数。
| 名称 | 类型 | 默认值 |
|---|---|---|
| acceleration | double | 0.05 |
| attackConstant | double | 1 |
| collisionRange | double | 5 |
| color | Color | gold |
| deathConstant | double | 0.23109 |
| deathRange | double | 10 |
| dt | double | 5 |
| height | double | 500 |
| hitPoint | double | 不填 |
| initHeading | double | uniform() * 2 * Math.PI |
| initSpeed | 速度(米每秒) | uniform(minimumSpeed, maximumSpeed) |
| initX | double | uniform() * width |
| initY | double | uniform() * height |
| maximumSpeed | 速度(米每秒) | 1.0 |
| minimumSpeed | 速度(米每秒) | 0.5 |
| retreatConstant | double | 1 |
| sensorRange | double | 500 |
| turnAngle | double | 0.03 |
| type | TypeOption | 不填 |
| width | double | 500 |
一共出现了4种类型的参数,分别是double、Color、速度(米每秒)和TypeOption,下面分别说明这4种类型的参数怎么设置。
double类型的参数按照下图方式设置即可。
Color类型的参数按照下图方式设置即可。
速度(米每秒)类型的参数按照下图方式设置即可。
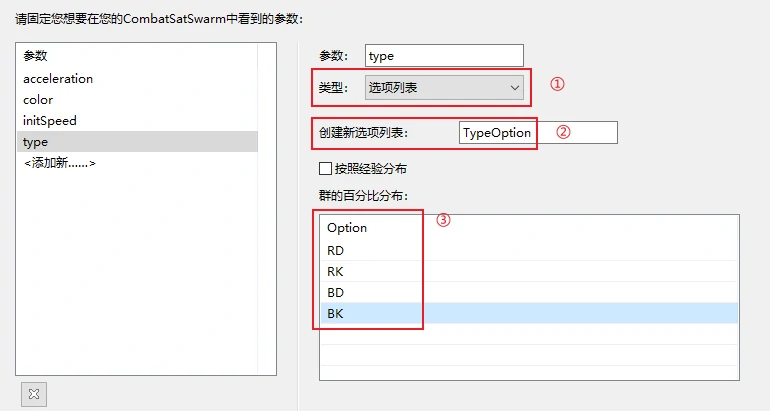
TypeOption类型的参数按照下图方式设置即可。
注意!!!完成一项参数设置之后,不要点击“下一步”,也不要按回车键,左键单击<添加新…>才能添加新的参数!
第六步:创建群大小。有两个选项,“创建群具有xx个智能体”和“创建初始为空的群”,我会在模型运行时添加智能体,按需选择。我发现的规律:要是一些固定不变的智能体群,例如房子、发电机组,可以选择创建群具有xx个智能体;要是一些在运行过程中会有数量变化的智能体群,例如轰炸机、鸟群,可以选择创建初始为空的群,我会在模型运行时添加智能体。点击下一步。

第七步:配置环境。目前我能用到了有两个地方,一个是大小,一个是应用随机布局。大小的话根据模型实际需要设置,应用随机布局是否勾选同样看要解决的问题实际要求。点击完成。

好了!CombatSatSwarm就这样创建好了!
5. 添加智能体群参数
来看看一共有多少参数。
有下面这些:
- 参数;
- 变量;
- 事件;
- 函数。
5.1 参数
智能体的参数已经在第4章详细说明了,在这里不再赘述。
5.2 变量
和第3.2节添加变量添加进场景中的顺序一样。按照这个顺序来,“面板”——>“智能体”——>“智能体组件”——>“变量”,鼠标左键单击拖拽进场景中即可,同样在“属性”栏中设置名称和类型,初始值不用设置。
这里给出所有用到的变量的名称、类型。
| 名称 | 类型 | 默认值 |
|---|---|---|
| flock | Main | get_Main() |
| heading | double | initHeading |
| x | double | initX |
| y | double | initY |
| friendsNumber | double | 不填 |
| friendsX | double | 不填 |
| friendsY | double | 不填 |
| nearestFriend | CombatSatSwarm | 不填 |
| enemiesNumber | double | 不填 |
| enemiesX | double | 不填 |
| enemiesY | double | 不填 |
| nearestEnemy | CombatSatSwarm | 不填 |
| dead | boolean | false |
| attacking | boolean | false |
| colorDarker | 其他……Color | gold.darker() |
| colorDarkerDarker | 其他……Color | gold.darker().darker() |
| friendsHeading | double | 不填 |
| friendsSpeed | double | 不填 |
| deathRangeNumber | double | 不填 |
| enemiesHeading | double | 不填 |
| enemiesSpeed | double | 不填 |
| traceX | 其他……double[] | new double[10]; |
| traceY | 其他……double[] | new double[10]; |
get_Main()为得到Main这个智能体的类型;gold.darker()为gold这个属性的颜色黑一级;gold.darker().darker()为gold这个属性黑两级。这俩函数意思就是让判断为死亡的智能体消失在场景中。
5.3 事件
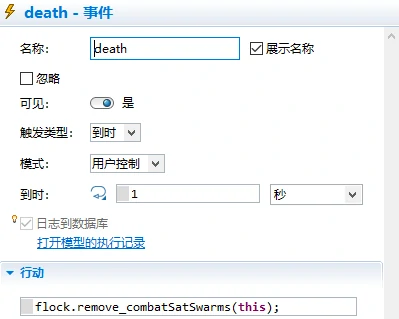
用于判断智能体死亡之后直接移除的事件,为death。
设置如下。
5.4 函数
这里是最复杂的函数设置,也是整个AnyLogic模型的精髓,我从上往下以此介绍。
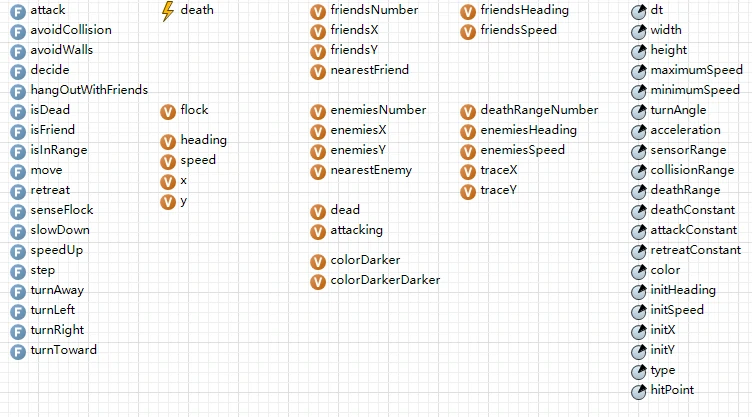
首先列写一下所有的函数。
- attack()
- avoidCollision()
- avoidWalls()
- decide()
- hangOutWithFriends()
- isDead()
- isFriend()
- isInRange()
- move()
- retreat()
- senseFlock()
- slowDown()
- speedUp()
- step()
- turnAway()
- turnLeft()
- turnRight()
- turnToward()
5.4.1. Function: attack()
Function: attack()-选择是否加速或者减速
Input: null
Constant:
    1. attacking [boolean]
    2. speed [double]
    3. enemiesX [double]
    4. enemiesY [double]
    5. enemiesSpeed [double]
Output: void
Function call:
    1. speedUp()
    2. slowDown()
-----------------------------------------------------------
attacking = true; // animation only
turnToward(enemiesX, enemiesY); // 修改航向,使自己能够朝向敌人
if (enemiesSpeed > speed) { // 如果敌人比自己速度快,加速
  speedUp();
}
else if (enemiesSpeed < speed) { // 如果敌人比自己速度慢,减速
  slowDown();
}
5.4.2. Function: avoidCollision()
Function: avoidCollision()-避免碰撞友军
Input: null
Constant:
    1. x [boolean]
    2. y [double]
    3. heading [double]
    4. nearestFriend [Boid]
Output: void
Function call:
    1. speedUp()
    2. slowDown()
    3. turnAway()
    4. cos()-BIF
    5. sin()-BIF
-----------------------------------------------------------
// 如果周围没有敌人,而且附近友军过于距离过于接近
CombatSatSwarm b = nearestFriend;

if (b == null)
  return;
turnAway(b.x, b.y);   // 计算该智能体 heading
double dx = b.x - x;  // 计算该智能体离初始位置 X 轴距离之差
double dy = b.y - y;  // 计算该智能体离初始位置 Y 轴距离之差
if (cos(heading) * cos(b.heading) + sin(heading) * sin(b.heading) > 0) { // 相同方向
  if (dx * cos(heading) + dy * sin(heading) < 0) { // 该智能体在其他智能体后面
    slowDown(); // 减速
  } else { // 该智能体在其他智能体前面
    speedUp();  // 加速
  }
} else {  // 往相反方向走
  if (dx * cos(heading) + dy * sin(heading) < 0) { // 用朝向角来控制避碰方向
    slowDown(); // 减速
  }
}
5.4.3. Function: avoidWalls()
Function: avoidWalls()-避免碰撞墙面
Input: null
Constant:
    1. x [boolean]
    2. y [double]
    3. heading [double]
    4. width [double]
    5. height [double]
    6. sensorRange [double]
Output: void
Function call:
    1. speedUp()
    2. slowDown()
    3. cos()-BIF
    4. sin()-BIF
-----------------------------------------------------------
// 避免碰撞墙面
double dxr = width - x; // 离墙面 X 轴距离
double dyd = height - y; // 离墙面 Y 轴距离

if (cos(heading) > 0) { // 往右走
  if (sin(heading) < 0) { // 往右-上走
    if (dxr < sensorRange) { // 探测距离小于距离右边的墙面 X 轴距离
      slowDown(); // 减速
      for (int i = 0; i < 1 + (int) (sensorRange / dxr); i++) turnLeft(); // 左转
    } else if (y < sensorRange) { // 探测距离小于距离上边的墙面 Y 轴距离
      slowDown(); // 减速
      for (int i = 0; i < 1 + (int) (sensorRange / y); i++) turnRight();  // 右转
    }
  } else { // 往右-下走
    if (dxr < sensorRange) { // 探测距离小于距离右边的墙面 X 轴距离
      slowDown(); // 减速
      for (int i = 0; i < 1 + (int) (sensorRange / dxr); i++) turnRight();  // 右转
    } else if (dyd < sensorRange) { // 探测距离小于距离下边的墙面 Y 轴距离
      slowDown(); // 减速
      for (int i = 0; i < 1 + (int) (sensorRange / dyd); i++) turnLeft(); // 左转
    }
  }
} else { // 往左走
  if (sin(heading) < 0) { // 往左-上走
    if (x < sensorRange) { // 探测距离小于距离左边的墙面 X 轴距离
      slowDown(); // 减速
      for (int i = 0; i < 1 + (int) (sensorRange / x); i++) turnRight(); // 右转
    } else if (y < sensorRange) { // 探测距离小于距离下边的墙面 Y 轴距离
      slowDown(); // 减速
      for (int i = 0; i < 1 + (int) (sensorRange / y); i++) turnLeft(); // 左转
    }
  } else { // 往左-下走
    if (x < sensorRange) { // 探测距离小于距离左边的墙面 X 轴距离
      slowDown(); // 减速
      for (int i = 0; i < 1 + (int) (sensorRange / x); i++) turnLeft(); // 左转
    } else if (dyd < sensorRange) { // 探测距离小于距离下边的墙面 Y 轴距离
      slowDown(); // 减速
      for (int i = 0; i < 1 + (int) (sensorRange / dyd); i++) turnRight(); // 右转
    }
  }
}
5.4.4. Function: decide()-决策智能体动作
Function: decide()
Input: null
Constant:
    1. speed [boolean]
    2. friendsNumber [double]
    3. nearestFriend [Boid]
    4. enemiesNumber [double]
    5. nearestEnemies [Boid]
    6. dead [boolean]
    7. attacking [boolean]
Output: void
Function call:
    1. isDead()
    2. restart()-BIF
    3. attack()
    4. retreat()
    5. avoidCollision()
    6. hangOutWithFriends()
    7. avoidwalls()
-----------------------------------------------------------
attacking = false; // 先不攻击
if (isDead()) { // 死了没,死了就置0
  speed = 0;
  dead = true;
  death.restart(20);  // 20ms(?)后重置death事件
} else { // 要是没死
  if (enemiesNumber > 0) { // 如果附近有敌人,这个参数在senseFlock()里面给出
    double friendsToEnemies = (friendsNumber + 1) / (double)enemiesNumber; // 友军/敌人之比
    if (friendsToEnemies > attackConstant) { // 友军多于敌人
      attack(); // 攻击
    } else if (friendsToEnemies < retreatConstant) { // 友军少于敌人
      retreat(); // 撤退
    }
  } else if (nearestFriend != null) { // 没有敌人,友军距离过近
    avoidCollision(); // 避碰
  } else { // 没有敌人,周围没有友军
    hangOutWithFriends();
  }
  // 避免碰撞墙面
  avoidWalls();
}
5.4.5. Function: hangOutWithFriends()
Function: hangOutWithFriends()-周围没有敌人也没有友军的随机游走
Input: null
Constant:
    1. speed [boolean]
    2. friendsNumber [double]
    3. friendsX [double]
    4. friendsY [double]
Output: void
Function call:
    1. speedUp()
    2. slowDown()
    3. turnLeft()
    4. turnRight()
-----------------------------------------------------------
if (friendsNumber > 0) { // 如果周围有友军
  turnToward(friendsX, friendsY);  // 判断向左还是向右移动
  if (friendsSpeed > speed) { // 友军速度大于己方速度
    speedUp();  // 加速
  } else if (friendsSpeed < speed) {  // 友军速度小于己方速度
    slowDown(); // 减速
  }
} else { // 如果周围没有友军
  slowDown(); // 减速
  if (uniform() < 0.5) // 50%的概率向左,50%的概率向右
    turnLeft();
  else
    turnRight();
}
5.4.6. Function: isDead()
Function: isDead()-判断是否死亡
Input: null
Constant:
    1. deathRangeNumber [boolean]
Output: true or false
Function call: null
-----------------------------------------------------------
// 如果HP归零,则代表死亡
if (hitPoint == 0){
    return true;
}else{
    return false;
}
5.4.7. Function: isFriend()
Function: isFriend()-判断是否为友军
Input:
    1. b [Boid]
Constant: null
Output: color.equals(b.color)
Function call:
    1. color.equal()
-----------------------------------------------------------
// 比对颜色是否一致,颜色一致即为友军
return color.equals(b.color);
5.4.8. Function: isInRange()
Function: isInRange()-判断是否在范围内
Input:
    1. b [Boid]
    2. range [double]
Constant:
    1. x [double]
    2. y [double]
Output: dx * dx + dy * dy < range * range
Function call: null
-----------------------------------------------------------
double dx = b.x - x;
double dy = b.y - y;
// 在范围内,则返回1;不在范围内,则返回0
return dx * dx + dy * dy < range * range;
5.4.9. Function: move()
Function: move()-移动
Input: null
Constant:
    1. heading [double]
    2. speed [double]
    3. x [double]
    4. y [double]
    5. traceX [double[]]
    6. traceY [double[]]
    7. dt [double]
    8. width [double]
    9. height [double]
Output: null
Function call:
    1. length()-BIF
-----------------------------------------------------------
// 根据计算出来的 heading 更新坐标位置
x += speed * dt * cos(heading);
y += speed * dt * sin(heading);
// 避免触碰边界
if (x > width)
  x -= width;
else if (x < 0)
  x += width;
if (y > height)
  y -= height;
else if (y < 0)
  y += height;
// 用来显示当前的轨迹(动画效果)
for (int i = traceX.length - 1; i > 0; i--) {
  traceX[i] = traceX[i-1];
  traceY[i] = traceY[i-1];
}
traceX[0] = x;
traceY[0] = y;
5.4.10. Function: retreat()
Function: retreat()-撤退
Input: null
Constant:
    1. enemiesX [double]
    2. enemiesY [double]
Output: null
Function call:
    1. turnAway()
    2. speedUp()
-----------------------------------------------------------
// 远离敌人,并加速
turnAway(enemiesX, enemiesY);
speedUp();
5.4.11. Function: senseFlock()
Function: senseFlock()-探测友军或者敌军
Input: null
Constant:
    1. flock [Flock]
    2. heading [double]
    3. speed [double]
    4. x [double]
    5. y [double]
    6. friendsNumber [double]
    7. friendsX [double]
    8. friendsY [double]
    9. nearestFriend [Boid]
    10. enemiesNumber [double]
    11. enemiesX [double]
    12. enemiesY [double]
    13. nearestEnemy [Boid]
    14. friendsHeading [double]
    15. friendsSpeed [double]
    16. deathRangeNumber [double]
    17. enemiesHeading [double]
    18. enemiesSpeed [double]
    19. sensorRange [double]
    20. collisionRange [double]
    21. deathRange [double]
Output: null
Function call:
    1. isFriend()
    2. isInRange()
    3. Math.sqrt-BIK
    4. size()-BIF
    5. get()-BIF
-----------------------------------------------------------
friendsNumber = 0;                  // 假设友方数量为0
double totalFriendsX       = 0.0;
double totalFriendsY       = 0.0;
double totalFriendsSpeed   = 0.0;
double totalFriendsHeading = 0.0;

enemiesNumber = 0;                  // 假设敌方数量为0
double totalEnemiesX       = 0.0;
double totalEnemiesY       = 0.0;
double totalEnemiesSpeed   = 0.0;
double totalEnemiesHeading = 0.0;

nearestFriend = null;               // 假设周围没有友军
nearestEnemy  = null;               // 假设周围没有敌人
deathRangeNumber = 0;               // 死亡数

double distanceToFriend = collisionRange; // 与友军的距离是避碰距离

for (int i = 0; i < flock.boids.size(); i++) {
  CombatSatSwarm b = flock.boids.get(i); // Main中的第i个combatSatSwarm

  if (b.dead || b == this) // 如果是友军或者自己
    continue;
  if (isFriend(b)) { // 如果是友军
    // 判断它是否为距离最近的友军
    if (isInRange(b, distanceToFriend)) {
      nearestFriend = b;
      distanceToFriend = Math.sqrt((b.x - x) * (b.x - x) + (b.y - y) * (b.y - y));
    }
    if (isInRange(b, sensorRange)) { // 这个被认作友军的智能体在探测范围内,则友军数加1
      friendsNumber++;
      totalFriendsX += b.x;
      totalFriendsY += b.y;
      totalFriendsSpeed   += b.speed;
      totalFriendsHeading += b.heading;
    }
  } else {
    if (isInRange(b, deathRange)) { // 这一段意思就是假如一个智能体接近另一个智能体,则HP-1
      deathRangeNumber++;
      b.hitPoint -= 1;              // HP-1
      if (b.hitPoint < 0){          // HP=0,则认为死亡
      	b.hitPoint = 0;
      }
    }
    if (isInRange(b, sensorRange)) { // 这个被认作敌军的智能体在探测范围内,则敌军数加1
      enemiesNumber++;
      totalEnemiesX += b.x;
      totalEnemiesY += b.y;
      totalEnemiesSpeed   += b.speed;
      totalEnemiesHeading += b.heading;
    }
  }
}

if (friendsNumber == 0) { // 如果周围没有友军,把参数用自己的参数替代了
  friendsHeading = heading;
  friendsSpeed   = speed;
  friendsX = x;
  friendsY = y;
} else { // 否则不能
  friendsHeading = totalFriendsHeading / friendsNumber;
  friendsSpeed   = totalFriendsSpeed / friendsNumber;
  friendsX = totalFriendsX / friendsNumber;
  friendsY = totalFriendsY / friendsNumber;
}

if (enemiesNumber == 0) { // 如果周围没有敌军,把参数用自己的参数替代了
  enemiesHeading = heading;
  enemiesSpeed   = speed;
  enemiesX = x;
  enemiesY = y;
} else { // 否则不能
  enemiesHeading = totalEnemiesHeading / enemiesNumber;
  enemiesSpeed   = totalEnemiesSpeed / enemiesNumber;
  enemiesX = totalEnemiesX / enemiesNumber;
  enemiesY = totalEnemiesY / enemiesNumber;
}
5.4.12. Function: slowDown()
Function: slowDown()-减速
Input: null
Constant:
    1. minimumSpeed
    2. speed
    3. acceleration
    4. dt
Output: null
Function call:
    1. limitMin()-BIF
-----------------------------------------------------------
speed = limitMin(minimumSpeed, speed - acceleration * dt);
5.4.13. Function: speedUp()
Function: speedUp()-加速
Input: null
Constant:
    1. minimumSpeed
    2. speed
    3. acceleration
    4. dt
Output: null
Function call:
    1. limitMax()-BIF
-----------------------------------------------------------
speed = limitMax(speed + acceleration * dt, maximumSpeed);
5.4.14. Function: step()
Function: step()
Input: null
Constant:
    1. dead
Output: null
Function call:
    1. senseFlock()
    2. decide()
    3. move()
-----------------------------------------------------------
if (! dead) {
  /*
  这是整个函数的关键部分,分为三步,
  1. 探测友军和敌军
  2. 决策下一步的动作
  3. 移动
  */
  senseFlock();
  decide();
  move();
}
5.4.15. Function: turnAway()
Function: turnAway()-远离其他智能体
Input:
    1. xPos [double]
    2. yPos [double]
Constant:
    1. x [double]
    2. y [double]
    3. heading [double]
Output: null
Function call:
    1. turnLeft()
    2. turnRight()
    3. sin()-BIF
    4. cos()-BIF
-----------------------------------------------------------
double dx = xPos - x;
double dy = yPos - y;

if (cos(heading) * dy - sin(heading) * dx > 0)
  turnLeft();
else
  turnRight();
5.4.16. Function: turnLeft()
Function: turnLeft()-左转
Input: null
Constant:
    1. heading [double]
    2. dt [double]
    3. turnAngle  [double]
Output: null
Function call:
    1. Math.PI-BIK
-----------------------------------------------------------
heading = (heading - turnAngle * dt) % (2 * Math.PI);
5.4.17. Function: turnRight()
Function: turnRight()-右转
Input: null
Constant:
    1. heading [double]
    2. dt [double]
    3. turnAngle  [double]
Output: null
Function call:
    1. Math.PI-BIK
-----------------------------------------------------------
heading = (heading + turnAngle * dt) % (2 * Math.PI);
5.4.18. Function: turnToward()
Function: turnToward()-计算 heading
Input:
    1. xPos [double]
    2. yPos [double]
Constant:
    1. x [double]
    2. y [double]
    3. heading [double]
Output: null
Function call:
    1. turnLeft()
    2. turnRight()
    3. sin()-BIF
    4. cos()-BIF
-----------------------------------------------------------
double dx = xPos - x;
double dy = yPos - y;

if (cos(heading) * dy - sin(heading) * dx < 0)
  turnLeft();
else
  turnRight();
5.5 添加智能体几何图形的参数
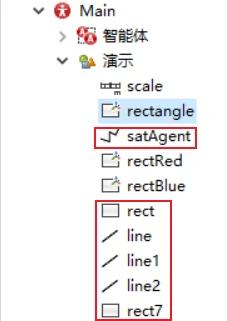
点击“工程”中的Main,回到Main场景,再点击Main下面的演示。这里要设置:
satAgent;rect;line;line1;line2;rect7
的几何参数,让智能体动起来。
5.5.1 satAgent
线颜色:无色
填充颜色:combatSatSwarms.get(index).dead ? combatSatSwarms.get(index).colorDarkerDarker : combatSatSwarms.get(index).color
线宽:1pt
线样式:下拉列表第一个
X:combatSatSwarms.get(index).x
Y:combatSatSwarms.get(index).y
Z:0
Z-高度:10
旋转,弧度:combatSatSwarms.get(index).heading
其余不用设置。
5.5.2 rect
线颜色:无色
填充颜色:combatSatSwarms.get(index).attacking ? combatSatSwarms.get(index).colorDarker : null
线宽:1pt
线样式:下拉列表第一个
X:combatSatSwarms.get(index).enemiesX - 10
宽度:20
Y:combatSatSwarms.get(index).enemiesY - 10
高度:20
Z:0
Z-高度:10
旋转,弧度:0.0 度
其余不用设置。
5.5.3 line
线颜色:无色
填充颜色:combatSatSwarms.get(index).attacking ? combatSatSwarms.get(index).colorDarker : null
线宽:1pt
线样式:下拉列表第一个
X:combatSatSwarms.get(index).enemiesX - 5
dX:10
Y:combatSatSwarms.get(index).enemiesY
dY:0
Z:0
Z-高度:10
其余不用设置。
5.5.4 line1
线颜色:无色
填充颜色:combatSatSwarms.get(index).attacking ? combatSatSwarms.get(index).colorDarker : null
线宽:1pt
线样式:下拉列表第一个
X:combatSatSwarms.get(index).enemiesX
dX:0
Y:combatSatSwarms.get(index).enemiesY - 5
dY:10
Z:0
Z-高度:10
其余不用设置。
5.5.5 line2
线颜色:无色
填充颜色:combatSatSwarms.get(index).attacking ? combatSatSwarms.get(index).colorDarkerDarker : null
线宽:1pt
线样式:下拉列表第一个
X:combatSatSwarms.get(index).x
dX:combatSatSwarms.get(index).enemiesX - combatSatSwarms.get(index).x
Y:combatSatSwarms.get(index).y
dY:combatSatSwarms.get(index).enemiesY - combatSatSwarms.get(index).y
Z:0
Z-高度:10
其余不用设置。
5.5.2 rect7
线颜色:无色
填充颜色:combatSatSwarms.get(index/10).colorDarker
线宽:1pt
线样式:下拉列表第一个
X:combatSatSwarms.get(index/10).traceX[ index%10 ]
宽度:2
Y:combatSatSwarms.get(index/10).traceY[ index%10 ]
高度:10
Z:0
Z-高度:10
旋转,弧度:0.0 度
其余不用设置。
6. 仿真验证
到这里,所有的设置全部完成了。
点击AnyLogic的运行按钮即可运行模型。
输出结果会导出至已经设置好的excel文件中。
需要注意的是,验证平方律在Main启动时行动中让RD和BD使用injectTeam即可;验证线性律在Main启动时行动中让RK和BK使用injectTeam。
同时,还有在MATLAB中写出相应代码仿真Lanchester平方律和线性律,代码如下:
clear;clc;close all;
tic;
t_interval = 1e-2;
t_total = 0.6;

x_d0 = 500;
x_k0 = 500;

y_d0 = 170;
y_k0 = 170;

phi_d_11 = 1;
phi_d_12 = 0;
phi_k_11 = 0;
phi_k_12 = 0;

psi_d_11 = 1;
psi_d_12 = 0;
psi_k_11 = 0;
psi_k_12 = 0;


a_d_11 = 1;
a_d_12 = 1;
a_k_11 = 1;
a_k_12 = 1;

b_d_11 = 10;
b_d_12 = 10;
b_k_11 = 10;
b_k_12 = 10;

x0 = [x_d0 x_k0 y_d0 y_k0];
opts = odeset('RelTol',1e-6,'AbsTol',1e-6); % 设置求解选项

uvSpt.u_d0 = u_d0; uvSpt.u_k0 = u_k0; uvSpt.v_d0 = v_d0; uvSpt.v_k0 = v_k0;

matAlc.phi_d_11 = phi_d_11; matAlc.phi_d_12 = phi_d_12;
matAlc.phi_k_11 = phi_k_11; matAlc.phi_k_12 = phi_k_12;
matAlc.psi_d_11 = psi_d_11; matAlc.psi_d_12 = psi_d_12;
matAlc.psi_k_11 = psi_k_11; matAlc.psi_k_12 = psi_k_12;

matAtr.a_d_11 = a_d_11; matAtr.a_d_12 = a_d_12;
matAtr.a_k_11 = a_k_11; matAtr.a_k_12 = a_k_12;
matAtr.b_d_11 = b_d_11; matAtr.b_d_12 = b_d_12;
matAtr.b_k_11 = b_k_11; matAtr.b_k_12 = b_k_12;

[t_timout, res] = ode45(@fAsyLanCompare,(0:t_interval:t_total),x0,opts,uvSpt,matAlc,matAtr);
toc;

%% 函数模块
function res = fAsyLanCompare(t,x,uvSpt,matAlc,matAtr)
x_d0 = x(1);
x_k0 = x(2);
y_d0 = x(3);
y_k0 = x(4);

u_d0 = uvSpt.u_d0;
u_k0 = uvSpt.u_k0;
v_d0 = uvSpt.v_d0;
v_k0 = uvSpt.v_k0;

phi_d_11 = matAlc.phi_d_11;
phi_d_12 = matAlc.phi_d_12;
phi_k_11 = matAlc.phi_k_11;
phi_k_12 = matAlc.phi_k_12;
psi_d_11 = matAlc.psi_d_11;
psi_d_12 = matAlc.psi_d_12;
psi_k_11 = matAlc.psi_k_11;
psi_k_12 = matAlc.psi_k_12;

a_d_11 = matAtr.a_d_11;
a_d_12 = matAtr.a_d_12;
a_k_11 = matAtr.a_k_11;
a_k_12 = matAtr.a_k_12;
b_d_11 = matAtr.b_d_11;
b_d_12 = matAtr.b_d_12;
b_k_11 = matAtr.b_k_11;
b_k_12 = matAtr.b_k_12;

% 根据构建的模型用代码复现
dy_d = -phi_d_11*(a_d_11*x_d0) ...
       -phi_k_11*(a_k_11) + v_d0;

dy_k = -phi_d_12*(a_d_12*x_d0) ...
       -phi_k_12*(a_k_12) + v_k0;

dx_d = -psi_d_11*(b_d_11*y_d0) ...
       -psi_k_11*(b_k_11) + u_d0;

dx_k = -psi_d_12*(b_d_12*y_d0) ...
       -psi_k_12*(b_k_12) + u_k0;

% 如果兵力为零,则导数也为零
if x_d0 <= 0
    dx_d = 0;
end
if x_k0 <= 0
    dx_k = 0;
end
if y_d0 <= 0
    dy_d = 0;
end
if y_k0 <= 0
    dy_k = 0;
end

% 记录结果
res =[dx_d;dx_k;dy_d;dy_k];
end
比较两者结果,最后会得到如下曲线图。
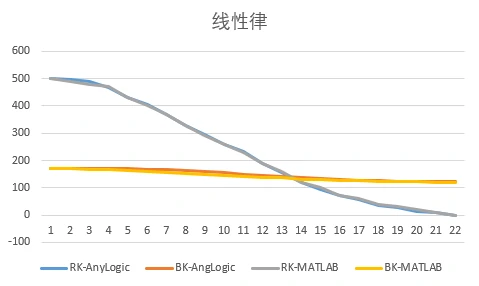
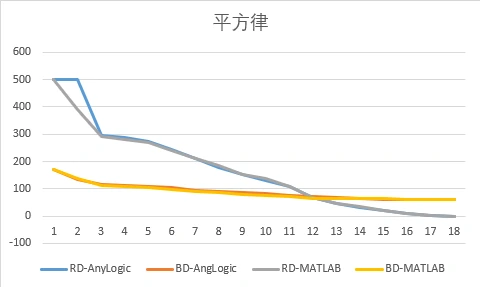
曲线十分贴合,成功验证。
到这里就结束了,如果需要PDF文件或者交流,欢迎通过邮箱联系我:lordofdapanji@foxmail.com